Introduction
Scenarios are a feature of Antares that allows additional information to be displayed during simulation of a circuit, which helps to better understand how the circuit works.
Currently the following types of additional information are supported:
-
Display of text with explanations
-
Highlighting of components and wires
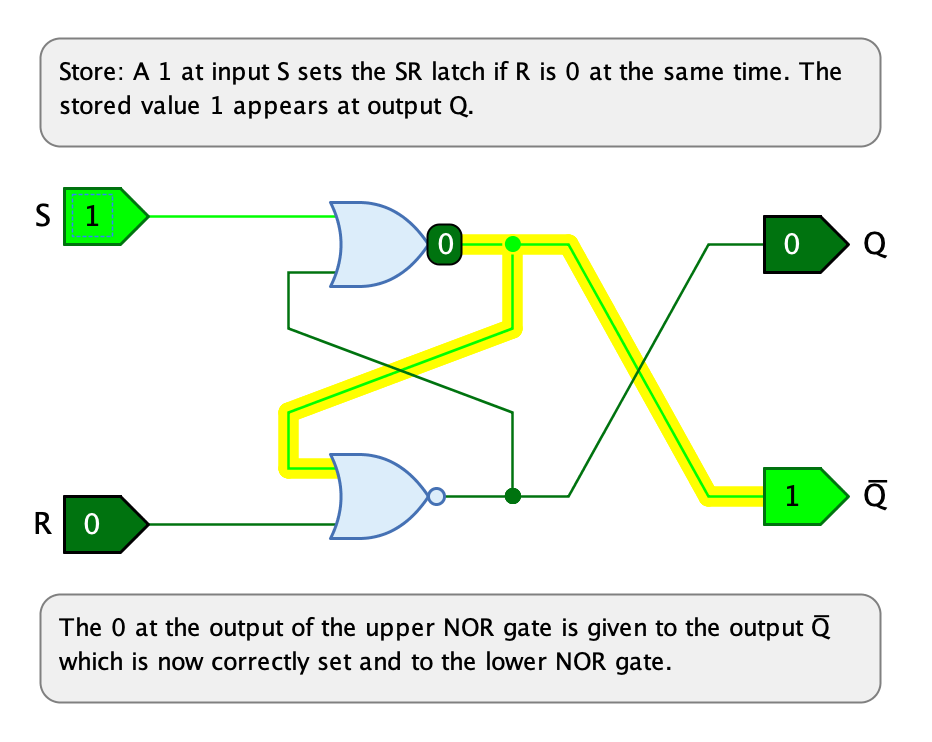
The following example shows the circuit "SR Latch" from the standard library during execution of the simulation after the user clicked on the input "S" while the latch was reset. Note the two text boxes with explanations displayed above and below the circuit and the highlighting of the wire coming from the upper OR gate.
Concept
As the author of a circuit, you can define scenarios, which in turn consist of scenario steps. For scenarios and scenario steps you define the conditions under which they are activated. These conditions are, for example, current output signals from components of the circuit. Antares constantly checks during simulation whether one of these conditions has occurred, and if so, activates the relevant scenario and/or scenario step. The activation causes the additional information you have defined for this scenario or scenario step to be displayed.
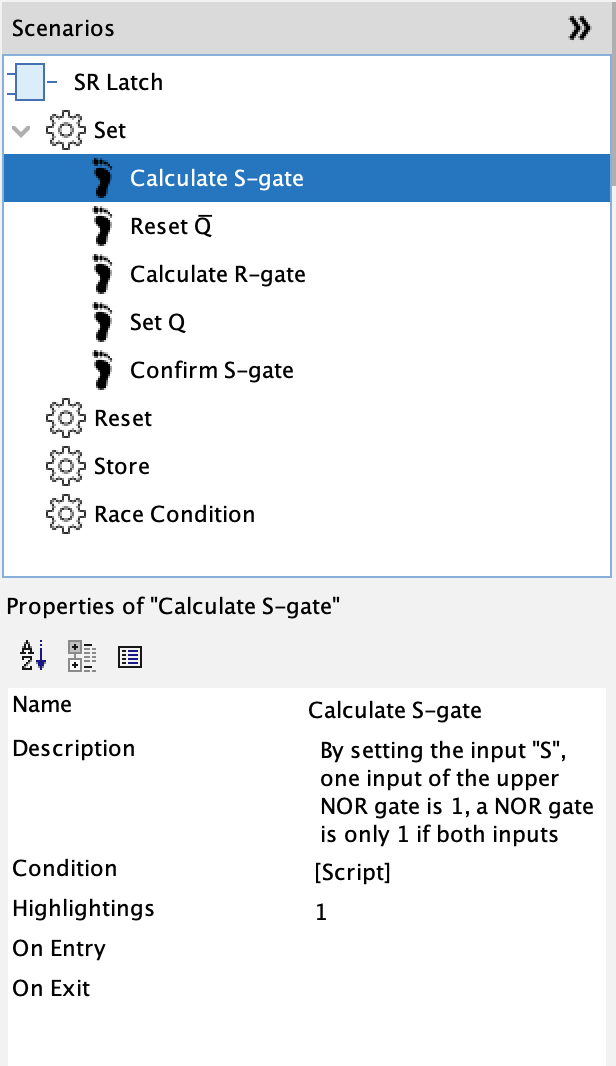
In the above example of "SR Latch", the author of the circuit has defined four scenarios:
-
Set: The condition of this scenario is that S has the value 1 and R has the value 0. The latch is therefore set.
-
Reset: The condition of this scenario is that S has the value 0 and R has the value 1. The latch is therefore reset.
-
Store: The condition of this scenario is that both S and R are 0. This is the store case: The current output value should be retained even after the input signals have disappeared.
-
Race Condition: The condition of this scenario is that both S and R have the value 1. This is an illegal use of the "SR Latch".
Scenario steps can be used to further refine a single scenario, e.g. to explain the individual steps that happen until the latch locks into the "Set" state. A scenario step can only be active if its parent scenario is active as well.
For scenario steps, it can be useful not only to display explanatory texts, but also to highlight the component that plays an important role in this scenario step, or to highlight wires through which a signal important for this scenario step is transmitted.
The explanation text of an active scenario is displayed in a text box above the circuit, while the explanation text of an active scenario step is displayed below the circuit.
Scenarios and their scenario steps are always saved together with the open circuit.
See Scripting in Scenarios for an in-depth explanation of how to use scripting for scenarios.
Configuration
Scenarios of the currently open circuit are configured in the "Scenarios" sidebar on the right side of the Antares window.
The sidebar contains a tree with all scenarios (gear icon) and their scenario steps (footprint icon). When you select a node in the tree, the properties of the object are displayed in the properties view below it and offered for modification.
Selecting a scenario or a scenario step in the tree also causes its descriptions and highlights to be displayed in the open circuit even in edit mode. This helps you to check, for example, whether the IDs of components to be highlighted are set correctly.
| Select the topmost node in the tree (in the example "SR Latch") to make the descriptions and highlights disappear. |
Actions
To add or delete scenarios or scenario steps, select a node in the tree and perform an action from the main menu or the context menu (right mouse button).
- New Scenario
-
Context menu on the circuit node. After entering the name of the new scenario (in the current language), the new scenario is added to the tree.
- Delete Scenario
-
Context menu on the scenario node. After a confirmation prompt, the selected scenario and all its scenario steps are deleted.
- New Scenario Step
-
Context menu on the scenario node. After entering the name of the new scenario step (in the current language), the new scenario step is added to the scenario in the tree.
- Delete Scenario Step
-
Context menu on the scenario step node. After a confirmation prompt, the selected scenario step is deleted.
- Move Scenario Step
-
You can use drag & drop to change the sequence of scenarios or scenario steps.
Properties of scenarios
- Name
-
The name of the scenario, which can be translated into all supported languages. In the current version of Antares, it is only used for display in the tree.
- Description
-
The description of the scenario, which can be translated into all supported languages. It is displayed during simulation in a text box above the circuit as long as the scenario is active.
- Condition
-
The script with the condition that must be fulfilled for this scenario to be activated. If several scenarios fulfill their condition at the same time, Antares will only activate the first of these scenarios. See Scripting for details on scripting.
ExampleS == 1 and R == 0
Properties of Scenario Steps
- Name
-
The name of the scenario step, which can be translated into all supported languages. It is only used in the current version of Antares for display in the tree.
- Description
-
The description of the scenario step, which can be translated into all supported languages. It will be displayed in a text box below the circuit during simulation, as long as the scenario step is active.
- Condition
-
The script with the condition that must be fulfilled in order for this scenario to be activated. If several scenario steps of the active scenario fulfilled their condition at the same time, Antares will activate only the first of these scenario steps. A scenario step can only be activated if the scenario it is part of is active. See Scripting for details on scripting.
Example#1:1 == 1 and #1:2 == 0 and #1:3 == 1 - Highlightings
-
A comma-separated list of IDs of components to be highlighted when the scenario step has been activated. The ID of a component is displayed in the properties window of the circuit when the component is selected. Antares displays highlighted components on a bright yellow background (the color may vary depending on the theme used).
Example9,11,13
- On Entry
-
The script that is executed when the scenario is activated.
- On Exit
-
The script that is executed when the scenario is deactivated.
Scenario Breakpoint
The menu can be used to activate or deactivate breakpoints for scenario steps. If activated, and the simulation runs in single-step mode, the simulation gets suspended in a breakpoint whenever a scenario step is activated.
Scenario breakpoints can be useful when writing tutorials with embedded explanations. If you create a scenario step for every point where something interesting happens in the circuit that you want to explain using scenario step descriptions, you can enable scenario step breakpoints to give the student enough time to read the explanation. When he’s done reading, he can resume the simulation using the "Pause/Resume" button.
This technique is especially useful when combined with a use case that runs through multiple use cases, only stopping at interesting points.
Can sometimes also be useful for debugging, because you can take benefit of Antares scripting to formulate complex breakpoint conditions when tracking down hard-to-find bugs in your design.
Disabling Scenarios
Scenario texts are displayed during simulation if the simulation speed category is "Observe" or slower. This is a fix system setting. You can disable scenario texts using menu .